
Table of Contents
Our Supporting Artisans who helped curate the products on this site will share commissions for purchases made through links in this post.Wood burning, or pyrography, is one of those old-school crafts that never really goes out of style. It’s all about using heated tools to etch designs right into the surface of wood. More and more folks are picking it up these days, probably because it’s just so satisfying to turn a plain scrap of wood into something uniquely yours.
With the right tools, a bit of practice, and some attention to safety, pretty much anyone can get into wood burning from home. Whether you’re after homemade gifts, want to jazz up your living room, or just need a new creative outlet, pyrography opens up a ton of options.
This guide lays out what you’ll need to get started, how to set up your workspace so you don’t burn your house down, and some techniques to help you make stuff that actually looks good.
Key Takeaways
- Wood burning is about using heat to make art on wood—beginners can pick it up with a little guidance
- Having a safe, well-set-up workspace is crucial for both your projects and your health
- Getting comfortable with the tools and some basic methods will make your art stand out
Understanding Wood Burning and Pyrography
Wood burning turns an ordinary chunk of wood into something way more interesting—with heat, not paint. The roots of this craft stretch back thousands of years. These days, it’s evolved into a legit art form with its own tools and tricks.
What Is Wood Burning?
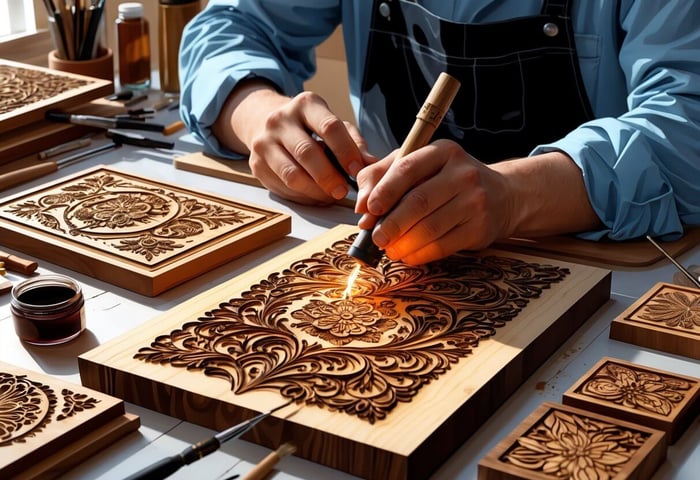
Pyrography literally means “writing with fire” (thanks, ancient Greeks). You use a heated pen or tool to burn lines and shading into wood. The marks are permanent—they’re part of the wood now, not just sitting on top like paint.
The basics? Heat up a metal tip, touch it to the wood, and see what happens. Light pressure gets you thin, delicate lines; steadier, deeper burns give you bolder, darker marks. There’s a surprising amount of control once you get the hang of it.
Some go-to wood burning tools:
- Electric wood-burning pens
- Solid-point burners (usually brass tips)
- Wire-nib burners for detail work
- Units with adjustable temperature
Since you’re burning the design into the wood itself, you don’t have to worry about it chipping or fading away over time.
Evolution and History of Pyrography
People have been burning designs into wood (and bone!) since, well, forever. There’s evidence of ceremonial objects with burn marks from ancient Peru, dating back to the Nazca culture. Egyptians used hot bronze to carve into coffins, and in China, fire-needle embroidery was a thing during the Han Dynasty.
Europeans in the Middle Ages got into “pokerwork,” using red-hot metal rods from the fire to decorate furniture and instruments. Fast forward to the 20th century, and electric pyrography pens made things a lot easier—and safer, honestly.
Now, with digital communities and better tools, the craft keeps evolving. Artists can go from simple patterns to full-on portraits, all with a hot pen and some patience.
Pyrography as a Modern Art Form
These days, pyrography isn’t just for rustic decorations or camp crafts. There are artists making serious, gallery-level pieces—sometimes combining wood burning with painting, carving, or other mixed media for wild effects.
Custom signs, wedding keepsakes, portraits, furniture details, and all sorts of mixed media pieces are popping up everywhere. The tools have gotten fancier, with precise temperature controls and swappable tips, so you can get really subtle shading or crazy textures if you want.
Online groups are full of people swapping patterns, tips, and showing off their finished pieces. It’s kind of amazing how much the community pushes each other to try new things and up their game.
Some woodworkers mix burning with carving or painting, making three-dimensional art that’s hard to ignore. There’s a lot of room to experiment.
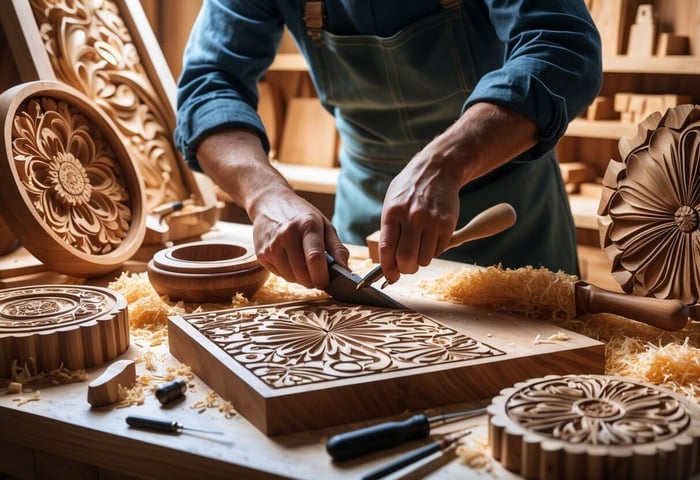
Essential Tools and Materials
If you’re just starting out, you don’t need a ton of stuff—just a good wood burning pen, some decent wood, and a handful of prep and finishing supplies. Don’t overthink it at first.
Overview of Wood Burning Tools
The main thing is your wood burning pen, which heats up and lets you burn designs into wood. There are a couple of types: solid-point burners (fixed tips, simple to use) and wire-nib burners (faster heat-up, more control for details).
Most pens come with variable temperature settings, which is super helpful. Brands like Walnut Hollow are popular for starter kits—usually they’ll throw in a few different tips and some basic instructions.
Interchangeable tips are handy if you want to try different effects. You’ll probably end up with a favorite tip, but it’s nice to have options.
Types of Wood Burning Pens
Basic pens are kind of like soldering irons, just with more artsy tips. Plug ’em in, wait a few minutes, and you’re good to go.
Fixed-tip pens are cheap and simple, but you’re stuck with one tip shape and basic heat control. Variable temperature pens are a bit pricier but worth it for the control—especially if you’re working with different woods.
If you get into it, professional pens have multiple interchangeable tips, like:
- Writing tips for lines and letters
- Shading tips for filling in bigger spots
- Curved tips for smoother lines
- Specialty tips for patterns and textures
The nicer pens heat up faster, hold their temperature, and generally last longer. You’ll notice the difference if you burn a lot.
Choosing the Right Wood
Basswood is honestly the easiest for beginners—smooth, light, and burns evenly. Pine and fir are okay too, and they’re usually cheap.
Stay away from treated or finished wood; you don’t want to breathe in weird chemicals. Look for pieces that are smooth, dry, and light in color so your designs show up well.
- Smooth and even—no big knots or rough patches
- Dry—less moisture means cleaner burns
- Light-colored—burn marks pop more
Plywood works for practice, but it can burn weird because of the glue. For anything you want to keep, stick with solid wood.
Preparing and Finishing Materials
Sandpaper is your friend. Start with medium grit (120-150) to knock down rough spots, then switch to fine grit (220-320) for a smooth finish. The smoother the wood, the cleaner your lines will be.
Other basics you’ll want around:
- Pencils for sketching
- Erasers for fixing mistakes
- Transfer paper to copy patterns
- Rulers for straight lines
For finishing touches, consider:
- Wood stain if you want color
- Clear protective finish to seal your work
- Soft cloths for applying finishes
A small brush helps keep dust off your project. And don’t underestimate good lighting—it makes a world of difference for detail work.
Workspace Setup and Safety Practices
Setting up a safe, well-ventilated workspace is honestly non-negotiable. Wood burning gets hot—like, really hot—and the fumes can be nasty if you’re not careful. A few basic precautions go a long way.
Setting Up a Safe Workspace
Pick a heat-resistant surface—metal or stone is ideal. Those pens can hit 600°F, so a wooden desk isn’t your best bet.
Keep the area clutter-free. Seriously, move anything flammable (paper, fabric, etc.) out of reach. You don’t want to risk it.
It’s smart to have a smoke detector nearby—test it now and then to be safe.
If you can, use an adjustable drafting table so you’re not craning your neck, and it helps direct smoke away from your face.
Set up a spot for hot tools—a ceramic dish or metal stand works. Needle-nose pliers are handy for changing tips without burning yourself.
Never leave your pen plugged in and unattended. If you’re taking a break, unplug it. Every time.
And keep a fire extinguisher close, just in case. One that’s rated for electrical fires is best.
Proper Ventilation and Fume Management
Wood burning makes more smoke and fumes than you’d expect. It’s not just a little campfire smell—some woods release stuff you really don’t want to breathe.
Work somewhere with good airflow. Open windows and doors to get a cross-breeze going. If you’ve got a fan, use it to push smoke away from your face and out the window.
Avoid closed-off rooms or basements without ventilation. That’s just asking for trouble.
Air purifiers with carbon filters help with lingering smoke, but honestly, nothing beats fresh air. If you can work outside, even better. Just don’t let your tools get rained on.
Essential Safety Gear and Clothing
Grab some heat-resistant gloves or even just insulated finger guards—your hands will thank you after a few hours hovering over hot tools. Look for gloves that don’t turn your fingers into awkward sausages; you’ll want to keep some dexterity for all that detailed work.
Don’t skip safety glasses. Wood burning kicks up smoke and tiny bits of wood, and nobody wants those in their eyes. Clear lenses are usually the best bet so you can actually see what you’re doing.
If you’re working for more than a few minutes, a respirator mask is a smart move. N95s do a solid job filtering out most of the stuff you shouldn’t be breathing in.
Long hair? Tie it back—seriously. Hair ties or clips, whatever works, just keep it away from your face and out of the danger zone near the burner.
Stick with natural fiber clothing like cotton. Synthetics and hot surfaces? That’s a recipe for a melted mess.
Cover up with long sleeves and pants. Bare skin and hot tools don’t mix, and wood chips sting more than you’d think.
Lose the loose jewelry for now. Rings, bracelets, and dangly things can catch or heat up faster than you expect.
Fundamental Wood Burning Techniques
Getting comfortable with the basics—pulling, swinging, touching, sweeping, and scumbling—makes a huge difference in how your pyrography turns out. These techniques are what let you move from wobbly lines and patchy burns to crisp outlines, smooth shading, and all those little details that make your work stand out.
Line Work and Outlining
Line work is where it all starts. If you’re after crisp, clean lines, pull the burner toward your body instead of pushing it away. It feels more natural, and you’ll avoid those weird blobs that pop up when you push against the wood grain.
Pushing the nib forward just kind of chews up the wood and leaves uneven marks. Pulling—whether toward your elbow, wrist, or just your chest—gives you a lot more control.
The swing technique? It’s a little like swinging on a playground: come in gently, move through the line, and glide off. Don’t just stop on the wood or you’ll get scorch marks where you don’t want them.
Temperature control is a big deal. Lower heat gives you light, skinny lines. Crank it up and your lines get darker and thicker.
Keep your pressure and speed as steady as you can. Lighter pressure saves your nib and your hand won’t cramp up as fast.
Shading and Gradient Effects
Shading is where things start to look three-dimensional. The sweep technique is perfect for this—start slow, then speed up and lift off the wood as you go. It’s especially handy for things like eyelashes or blades of grass that need to taper off.
Start with a firmer touch, then ease up as you finish each stroke. It’s all about that gradual fade.
Scumbling is basically making tiny circles with your burner. It’s great for even shading, especially if you’ve got a shading nib on hand.
Play around with speed and heat. Move slower and use higher heat for dark spots; speed up and lower the temp for lighter areas.
Build up your gradients slowly. Trying to do it all in one pass usually just ends up looking blotchy.
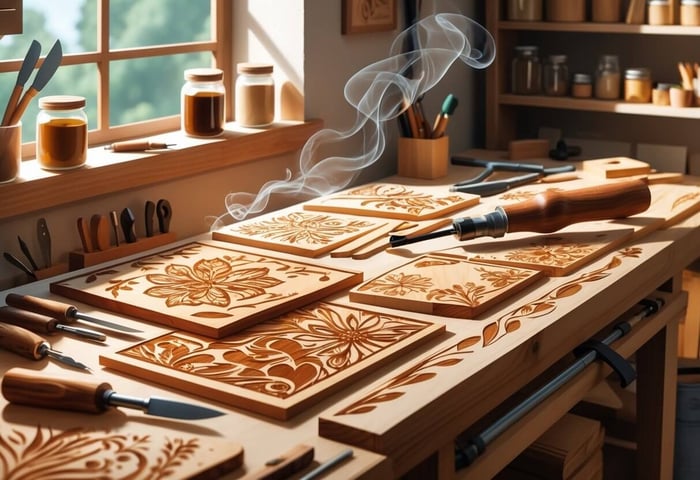
Texturing and Patterns
Texturing is how you give your wood art some personality. Different nibs combined with different motions open up all sorts of possibilities.
Ball point nibs are fantastic for curly hair or fur if you use a scumbling motion. Shader nibs cover big areas smoothly, perfect for backgrounds.
The direction of the wood grain changes everything. Burning with the grain feels smoother, but going against it can make cool contrasts—if you’re careful.
Want bark? Use short, random strokes that overlap a bit. For water or sky, longer, flowing lines work better.
Getting your patterns consistent takes some practice. Scrap wood is your friend here—don’t experiment on your final piece.
Stippling, Hatching, and Cross-Hatching
Stippling is all about dots. Tap the burner lightly for tiny points, or hold it down a bit longer for darker, bigger dots. It’s more about how long you touch the wood than how hard you press.
With hatching, you’re laying down parallel lines. Closer together means darker; farther apart means lighter. Simple, but really effective.
Cross-hatching just adds another layer, perpendicular to the first. Start light, then add more lines as you need more shadow or depth.
Mixing these up gives you tons of control over shading, especially when you want texture without super-smooth gradients. It’s perfect for illustrations or portraits where you want a bit more structure.
Advanced Tools and Brand Comparisons
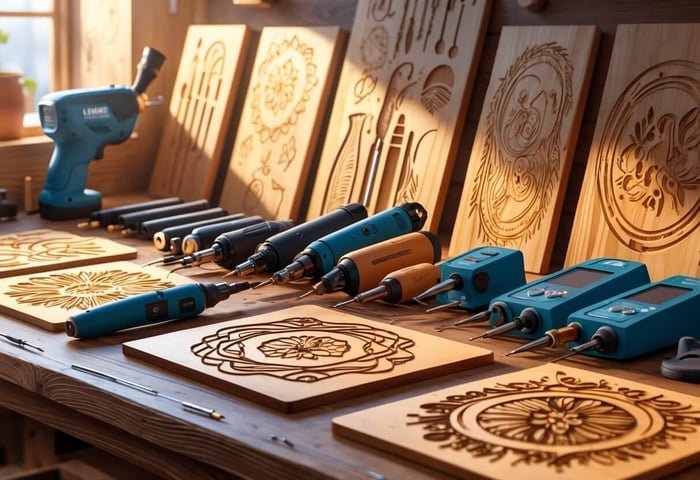
If you’re getting serious about wood burning, you’ll want tools that give you real control. Variable temperature pens with interchangeable tips are the way to go for detail work, and some brands—like Walnut Hollow—have earned a pretty good reputation among folks who spend a lot of time at the workbench.
Variable Temperature Pens and Controls
Variable temperature pens let you dial in the heat you need. Most cover a range from 200°C up to about 450°C, which is plenty for different woods and effects.
Wire-nib burners are fast—they’re ready to go in under a minute. That’s handy when you don’t want to stand around waiting for things to heat up.
Adjust that temperature depending on your wood. Softer woods burn up quick, so go lower. Harder woods can handle (and sometimes need) higher heat for clean lines.
Most of these pens run at about 60 watts, which seems to be the sweet spot for steady heat. Some pricier models have thermostats built in, which helps keep things consistent.
For reference:
- Light shading: 200-250°C
- General burning: 300-350°C
- Deep burning: 400-450°C
Benefits of Interchangeable Tips
Swapping out tips opens up a ton of creative options. Some kits come with 20, even 50+ different tips, so you’re covered for just about any effect.
Each tip has its own vibe. Fine points are great for outlines and tiny letters. Shader tips make filling in backgrounds a breeze.
Common tip types:
- Fine point: Outlines, small details
- Ball tip: Dots, curls, curves
- Shader: Smooth backgrounds, gradients
- Knife edge: Sharp lines, borders
- Specialty: Things like scales or feathers
If you’re burning a lot, you’ll need to replace tips now and then. Wire tips can be bent into custom shapes, which is fun if you like experimenting. Brass tips last longer but aren’t as flexible.
Changing tips is usually quick—just let them cool first. Most kits throw in a little stand for hot tips, which is surprisingly useful.
Popular Brands for Enthusiasts
Walnut Hollow’s kits are known for being sturdy and easy to use. The Creative Versa-Tool gets good marks for its temperature control and affordability.
Kopin kits come with a bunch of tips (32, give or take) and variable temp controls. They’re also nice for keeping everything organized thanks to the carrying case.
Uolor and Catnes both offer big sets—up to 54 tips—and use ceramic heaters so you’re not waiting around for your pen to warm up.
Quick brand rundown:
- Walnut Hollow: Solid build, easy for beginners
- Kopin: Lots of tips, temp control
- Uolor: Comfortable grip, heats up fast
- Catnes: Loads of tip options, stays cool in your hand
Most of these brands give you similar heat ranges. The real differences? Tip variety, how sturdy the pen feels, and what extras come in the box. Pick what fits your projects—and your wallet.
Crafting and Completing Your Wood Art
Getting from idea to finished piece takes a bit of planning, a steady hand, and some patience with the finishing touches. It’s all about getting your design onto the wood cleanly, burning with a consistent hand, and then sealing it up so it lasts.
Design Transfer and Planning
Transferring your design neatly is key. Pick the method that fits your style and the detail level you’re after.
Carbon paper is a favorite for intricate designs. Slip it between your pattern and the wood, trace the lines, and you’ll get clean marks without gouging the surface.
Graphite transfer is another solid choice. Rub pencil on the back of your design, then trace over the front—the graphite sticks and gives you a visible outline.
If you’re feeling brave or just working with something simple, sketch right on the wood with a pencil. It’s quick and gives you a bit more freedom to improvise.
Think about the order you’ll burn things. Start with the smallest details and outlines, then move on to bigger areas. That way you’re not accidentally smudging or damaging finished sections.
Keep your pencil marks light. Heavy lines can show through lighter burns, and you’ll have a tough time erasing them later.
Tips for Consistent Results
Even burns come from steady heat and a consistent pace. Set your tool for your wood type and try not to fiddle with the dial too much mid-project.
Find a comfortable speed—too fast and your lines go faint, too slow and you’ll scorch the wood. Scrap wood is perfect for dialing this in before you start for real.
Pressure matters:
- Light for thin lines
- Medium for most details
- Firm for bold outlines
Keep your tip clean. Soot builds up fast and messes with your heat transfer. A quick swipe with fine sandpaper or a cleaning pad does the trick.
Take breaks—seriously. Your hand will get tired, and shaky hands make for wobbly lines. Every 15 or 20 minutes, give yourself a rest.
Good lighting is underrated. If you can’t see what you’re burning, mistakes happen fast.
Finishing and Preserving Your Art
Before you seal anything, brush off soot and dust with a soft brush. It’s a small step but makes a big difference.
Lightly sand rough edges with fine-grit sandpaper, but don’t overdo it or you’ll lose your burn marks. Always sand with the grain.
Picking a finish depends on what you want:
| Finish Type | Best For | Appearance |
|---|---|---|
| Tung oil | Indoor pieces | Natural, warm glow |
| Polyurethane | High-use items | Clear, protective coat |
| Wax | Decorative art | Soft, matte finish |
Go for thin coats, not thick ones. Let each layer dry before adding more—patience pays off here.
Oil-based finishes will make your wood grain pop and darken the burn marks a bit. They’re tough but take longer to dry.
Water-based finishes dry fast and don’t change the color much. Good if you want to keep things light and natural-looking.
Don’t let finish pool in deep burns. Wipe away any excess with a brush or cloth so you don’t end up with shiny puddles.
Store your finished art somewhere dry and out of direct sunlight. Sun fades wood over time, and humidity can mess with the finish or even warp the piece. Nobody wants that.
FAQs
What types of wood are best suited for wood burning art?
Softwoods like pine and basswood are generally the easiest to work with, especially if you’re new to this. Their light color and smooth grain mean your designs show up clearly and burn pretty evenly.
Basswood, in particular, is a favorite for folks who want to get into the nitty-gritty of detailed work. The grain is subtle, and it doesn’t throw any surprises your way in terms of burning temperature.
Pine’s not bad for simpler stuff, though sometimes those sneaky resin pockets can make things a bit unpredictable.
If you’re feeling bold or just want your lines to come out darker, hardwoods like birch and oak can be rewarding, though they do take a steadier hand and a hotter tool.
It’s usually best to steer clear of woods with obvious knots, cracks, or rough patches. Your pen might skip or catch, and nobody wants to fight their materials.
How do you choose the right tips for different wood burning techniques?
Universal tips are a solid starting point for most basic burning tasks. They make medium-width lines, so they're handy for outlines and general stuff.
If you're after really detailed work or those razor-thin lines, grab a fine pointed tip. They're a bit trickier—steady hands help—but the precision is worth it.
For lettering, calligraphy tips are pretty much the go-to. Their angled edges keep your lines even, so your text actually looks like, well, text.
Shading tips are best when you need to fill bigger areas or want those smooth, gradual tone shifts. Since they're flat, you can cover more ground without fuss.
And then there are the specialty tips—ball tips for dotting, curved ones for, you know, curves or odd shapes. As you mess around and get better, you'll probably find yourself collecting a few of these just out of curiosity.
What are some creative ideas for wood burning projects?
If you’re just starting, things like wooden spoons, coasters, or small plaques are perfect. Flat, manageable, and not too precious if you mess up.
Personalized cutting boards can be a hit—think family names or little flourishes along the edge. Just pick a hardwood that’ll stand up to kitchen use.
Picture frames are another fun option. Nature-inspired borders or geometric corners can make them pop.
Wooden boxes or jewelry cases let you combine utility with creativity. They also make great gifts, if you’re into that sort of thing.
If you’re feeling adventurous, you can even try burning designs into leather—bookmarks, wallets, whatever. Just remember, leather needs a lower temperature than wood does.
Can you outline the basic techniques for beginners in wood burning art?
Start out practicing straight lines and simple curves. Don’t rush into fancy stuff until you’ve got a feel for how your tool handles.
Lighter pressure gives you delicate lines; more pressure gets you bold, dark marks. Go slow—steady hands make for smoother results.
Shading’s all about pen speed. Move slower for deeper burns, speed up for lighter tones. It’s a bit of trial and error, honestly.
Dotting is another fun technique—cluster the dots for dark spots, spread them out for lighter shading.
Try to burn with the grain when you can. It just feels better, and your lines come out cleaner.
What safety precautions should one take when engaging in wood burning?
Ventilation is key. Wood burning makes smoke and fumes, so crack a window or head outside if you can.
Keep a fire extinguisher within arm’s reach, and never leave your tool plugged in and unattended. Hot tips and wood shavings aren’t a great combo.
Always park your pen in a proper holder when you take a break—don’t just set it down anywhere.
Safety glasses are a good call, especially if you’re working with rough wood. And if you’re burning for a while, a dust mask isn’t a bad idea either.
A tidy workspace is safer (and less stressful). Clear away scraps and sawdust as you go.
How do you maintain and clean a wood burning tool?
Honestly, keeping your tips clean is half the battle. Wipe them down with a damp sponge or cloth while they’re still warm—just not piping hot. Avoid dunking them in water; that’s a recipe for cracks.
Once your tips have cooled off, stash them somewhere safe. A pen holder works, and it saves your desk from scorch marks.
If you get stubborn gunk, a bit of fine sandpaper or a tip cleaning kit usually does the trick. Don’t go overboard—just enough to get that smooth surface back.
Eventually, tips wear out or get damaged. When that happens, it’s time for a replacement. Dull tips make everything harder than it needs to be.
Beginners Wood Burning Kit for Kids and Teenage Boys & Girls - Cool Gifts for Boy or Girl Craft Projects

$34.99
$39.99
The Complete Woodburning Kit for Beginners: Includes everything needed to turn into a woodburning champion! Follow the step-by-step instructions, sketch, burn, and paint and produce 8 beautiful art projects. Designed for Beginners with Pro Grade Components: No woodburning experience? This… read more